[Kotlin / Spring] Spring Security 도입기 [2] : Custom Filter 구현하기
이전글 : [Kotlin / Spring] Spring Security 도입기 [1] : 의존성 설치하기
[1] CustomFilter 구현
Custom Filter를 구현하고자 하는 이유는 다음과 같다.
1. Basic 이 아닌 JWT 기반 Bearer 토큰을 사용할 것이다.
2. token에 대한 검증 이후 서비스이용 가능 여부를 검증하기 위한 밑작업을 할 것이다.
이를 위해서 한개 호출당 1회 실행되는 설정으로 OncePerRequestFilter() 를 상속받아 Filter class 를 작성하였다.
package project.config.filter

import project.model.AuthUserInfo
import project.model.JwtToken
import jakarta.servlet.FilterChain
import jakarta.servlet.http.HttpServletRequest
import jakarta.servlet.http.HttpServletResponse
import org.springframework.security.authentication.UsernamePasswordAuthenticationToken
import org.springframework.security.core.context.SecurityContextHolder
import org.springframework.web.filter.OncePerRequestFilter

class CustomFilter : OncePerRequestFilter() {
    override fun doFilterInternal(
        request: HttpServletRequest,
        response: HttpServletResponse,
        filterChain: FilterChain,
    ) {
        try {
            val authHeader = request.getHeader("Authorization")
            if (authHeader?.startsWith("Bearer ") == true) {
                val token = authHeader.removePrefix("Bearer ").trim()
                val jwtToken = JwtToken(accessToken = token)
                val tokenPayload = jwtToken.verifyAccessToken()
                val authUser = AuthUserInfo.of(userId = tokenPayload["userId"], userType = tokenPayload["userType"])
                val auth = UsernamePasswordAuthenticationToken(authUser, null, authUser.authorities)
                SecurityContextHolder.getContext().authentication = auth
                filterChain.doFilter(request, response)
            } else {
                throw Exception("wrong authorization")
            }
        } catch (e: Exception) {
            throw Exception(e)
        }
    }
}
1. 비즈니스 로직
1) Authorization 형식 확인
`token`
먼저 header 의 Authorization 에 담긴 값이 Bearer 로 시작하는지 검증한다. 안타깝게도 spring security 에서는 `Bearer ` 에 대한 내용을 자동으로 검증해주는 함수가 없어서 문자열로 직접 검증 해야 한다고 한다.
2) accessToken 검증
`jwtToken` & `tokenPayload`
이후로 accessToken 에 대한 검증을 진행한다. 이때 내가 만든 함수를 호출하여 검증하도록 한다.
해당 함수에는
- 만료된 토큰 여부
- 토큰의 payload 에 필수정보가 포함되어 있는지
등등에 대해서 검증하고 있다.
3) 인증된 object 생성
`authUser`
data class로 `AuthUserInfo` 를 생성하여 해당 클래스에 인증된 유저의 정보를 담아 객체를 생성한다.
4) SecurityContext 에 사용자 설정
`auth`
authUser 로 Authentication 객체를 만들고 이를 SecurityContextHolder에 authentication 값으로 갱신한다.
5) filter 통과
해당 필터 로직을 종료한다. (다음 필터가 있다면 그것진행. 없으면 이후 프로세스 진행됨)
2. Filter 에서의 Exception 처리
먼저 spring 으로 들어온 요청에 대한 영역을 구분하면 아래와 같다.
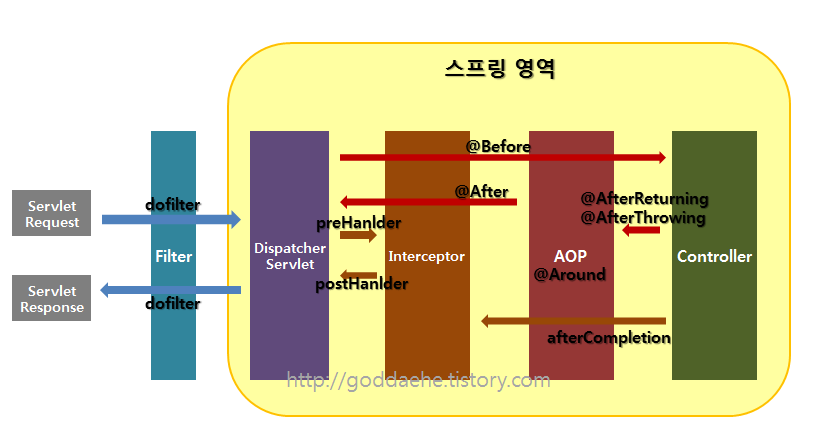
그림에서처럼 Filter 는 스프링 영역 밖에 존재한다. 이 점으로 인해서 Filter 에서 발생된 Exception 은 Interceptor나 Controller, Service 등과 달리 @ControllerAdvice 에 도달하지 않고 Servlet 수준에서 처리 된다.
위의 코드처럼 exception을 처리하면 Web Application 에 정의된 폼 대로 응답이 출력된다.

statusCode는 500이다.
{
    "timestamp": "2025-05-08T06:20:20.443+00:00",
    "status": 500,
    "error": "Internal Server Error",
    "path": "/api/auth/token/verify"
}
만약, 이미 가공한 형태의 에러응답이 있고 이를 사용하고 싶다면 직접 문자열로 작성하면 된다. 로깅도 잊지말자!
private fun processError(
    response: HttpServletResponse,
    errorCode: String,
    message: String,
    exceptionMessage: String,
) {
    response.status = 400
    response.contentType = "application/json"
    response.characterEncoding = "UTF-8"
    val body =
        """
        {
            "success": false,
            "response": null,
            "message":  "$message",
            "error": {
                        "code": "$errorCode",
                        "message": "$exceptionMessage"
                    },
        }
        """.trimIndent()
    response.writer.write(body)
}
해당 함수를 Filter class 안에 작성하고 에러발생시 해당 함수를 호출하도록 한다.
catch (e: JwtCustomException) {
        this.processError(response, "EXPIRED_TOKEN", "만료된 토큰" e.message)
        return
}
그럼 응답이 아래와 같이 나오며 statusCode는 400으로 출력된다.
{
    "success": false,
    "response": null,
    "message": "만료된 토큰",
    "error": {
        "code": "EXPIRED_TOKEN",
        "message": "JWT expired 72022520 milliseconds ago at 2025-05-07T10:28:21.000Z. Current time: 2025-05-08T06:28:43.520Z. Allowed clock skew: 0 milliseconds."
    },
}
다음으로는 이렇게 만든 CustomFilter 를 사용해 SecurityConfig 를 작성하고 인증시킬 조건에 대해 설정해보자